CARA SETTING NI GUNA SAMBUNGAN SECARA WIFI
credit to DSEM CHANNEL
CARA SETTING NI GUNA SAMBUNGAN SECARA WIFI
credit to DSEM CHANNEL
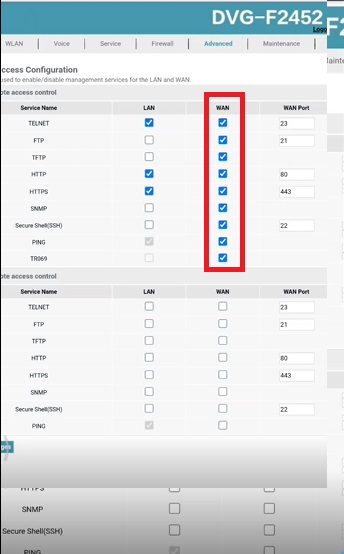
Cara config DLINK DVG-F2452 nak allow ping dan boleh buat remote dari luar
Go to Advanced > Static Route > tick semua pada column WAN

Jawapan ringkas dan mudah
normally alarm guna DTMF feature.. utk unifi ada feature ini (sama macam DEL) -boleh rujuk vendor alarm dulu/check balik setting.
terima kasih
Firmware version : V1.1.1
SETUP WIZARD
STEP 1: Open up a web browser and enter the default gateway’s IP address (192.168.0.1) in the Address\URL field.
STEP 2: Enter the username and password (admin/xxxxxxxx) according to device label
STEP 3: Click Login to log in to the Web page
This page will be shown by default for new device.
STEP 4: Click on Setup
STEP 5: Click on Next to Start Wizard.
STEP 6: Default mode is Gateway
STEP 7: Click Next to next step
STEP 8: Key in the PPP Username & Password
STEP 9: Click Next to continue
STEP 10: Click Next to continue
STEP 11: Maintain the default password configuration. (Password filled with current default random password according to device label)
STEP 12: Click Next to continue
STEP 13: Configure the 2.4 G and SSID and Password
STEP 14: Configure the 5 G and SSID and Password
STEP 15: Click Finished
Manual PPPoE Setup
STEP 1: Open up a web browser and enter the default gateway’s IP address (192.168.0.1) in the Address\URL field. STEP 2: Enter the username and password (admin/xxxxxxxx) according to device label STEP 3: Click Login to log in to the Web page STEP 4: Click TCP/IP STEP 5: Click WAN Setting STEP 6: Select WAN1 in Connection name STEP 7:Click IPv4 STEP 8: Select PPPoE STEP 9: Key in the PPP Username & Password STEP 10: Check to enable VLAN STEP 11: Fill in VLAN ID 500 STEP 12: Click Save & Apply the router to refresh
Look Firmware version : RP0100
STEP 1: Open up a web browser and enter the default gateway’s IP address (192.168.1.1) in the Address\URL field.
STEP 2: Enter the username and password (superadmin /f1ber@dm!n) according to device label
STEP 3: Click SIGN IN to log in to the Web page.
STEP 4: Click Advance Step
STEP 5: Click WAN Service
STEP 6: Select Connection name – 1_INTERNET_R_VID_500
STEP 7: Select Package Type: PPPoE
STEP 8: Select Mode: Route
STEP 9: Select IP Protocol Type: IPv4/ IPv6
STEP 10: Enable VLAN and enter VLAN ID 500
STEP 11: Select Service Type: INTERNET
STEP 12: Key in the PPP Username & Password
STEP 13: Select Dial Mode: Automatically
STEP 14: Select WAN Get IP Mode: PPPoE
STEP 15: Select Get IPv6 Prefix Mode: PrefixDelegation and Get IPv6 Address Mode: DHVPv6
STEP 16: Select Bound Ports: LAN 1,LAN 2, LAN 3, SSID 1 & SSID 6.
STEP 17: Click Apply to save config
STEP 18: *Reboot RG by power on off the device power button.
STEP 19: Select Status
STEP 20: Select WAN
STEP 21: Verify Connection Status: Connected
WiFi Configuration Setting
STEP 1: Open up a web browser and enter the default gateway’s IP address (192.168.1.1) in the Address\URL field.
STEP 2: Enter the username and password (superadmin /f1ber@dm!n) according to device label
STEP 3: Click SIGN IN to log in to the Web page
STEP 4: Select Basic Setup STEP 5: select WLAN STEP 6: Click Basic Config 2.4GHz STEP 7: Configure the SSID STEP 8: Click Apply to save the configuration. STEP 9: Repeat STEP 6 to STEP 6 for Basic Config 5GHz
STEP 10: Click Security Setting 2.4GHz STEP 11: Key In WPA Preshare key : password STEP 12: Click Apply to save the configuration STEP 13: Repeat STEP 10 to STEP 12 for Security Setting 5GHz