What is Band Steering and How it Works?

What is Band Steering and How it Works?

Band Steering is a new technology that aims to smoothen the broadband internet experience of the end-users. It allows you to get an uninterrupted and seamless browsing experience. It is an apt technology developed for wi-fi networks handling multiple devices at the same time.

wifi band

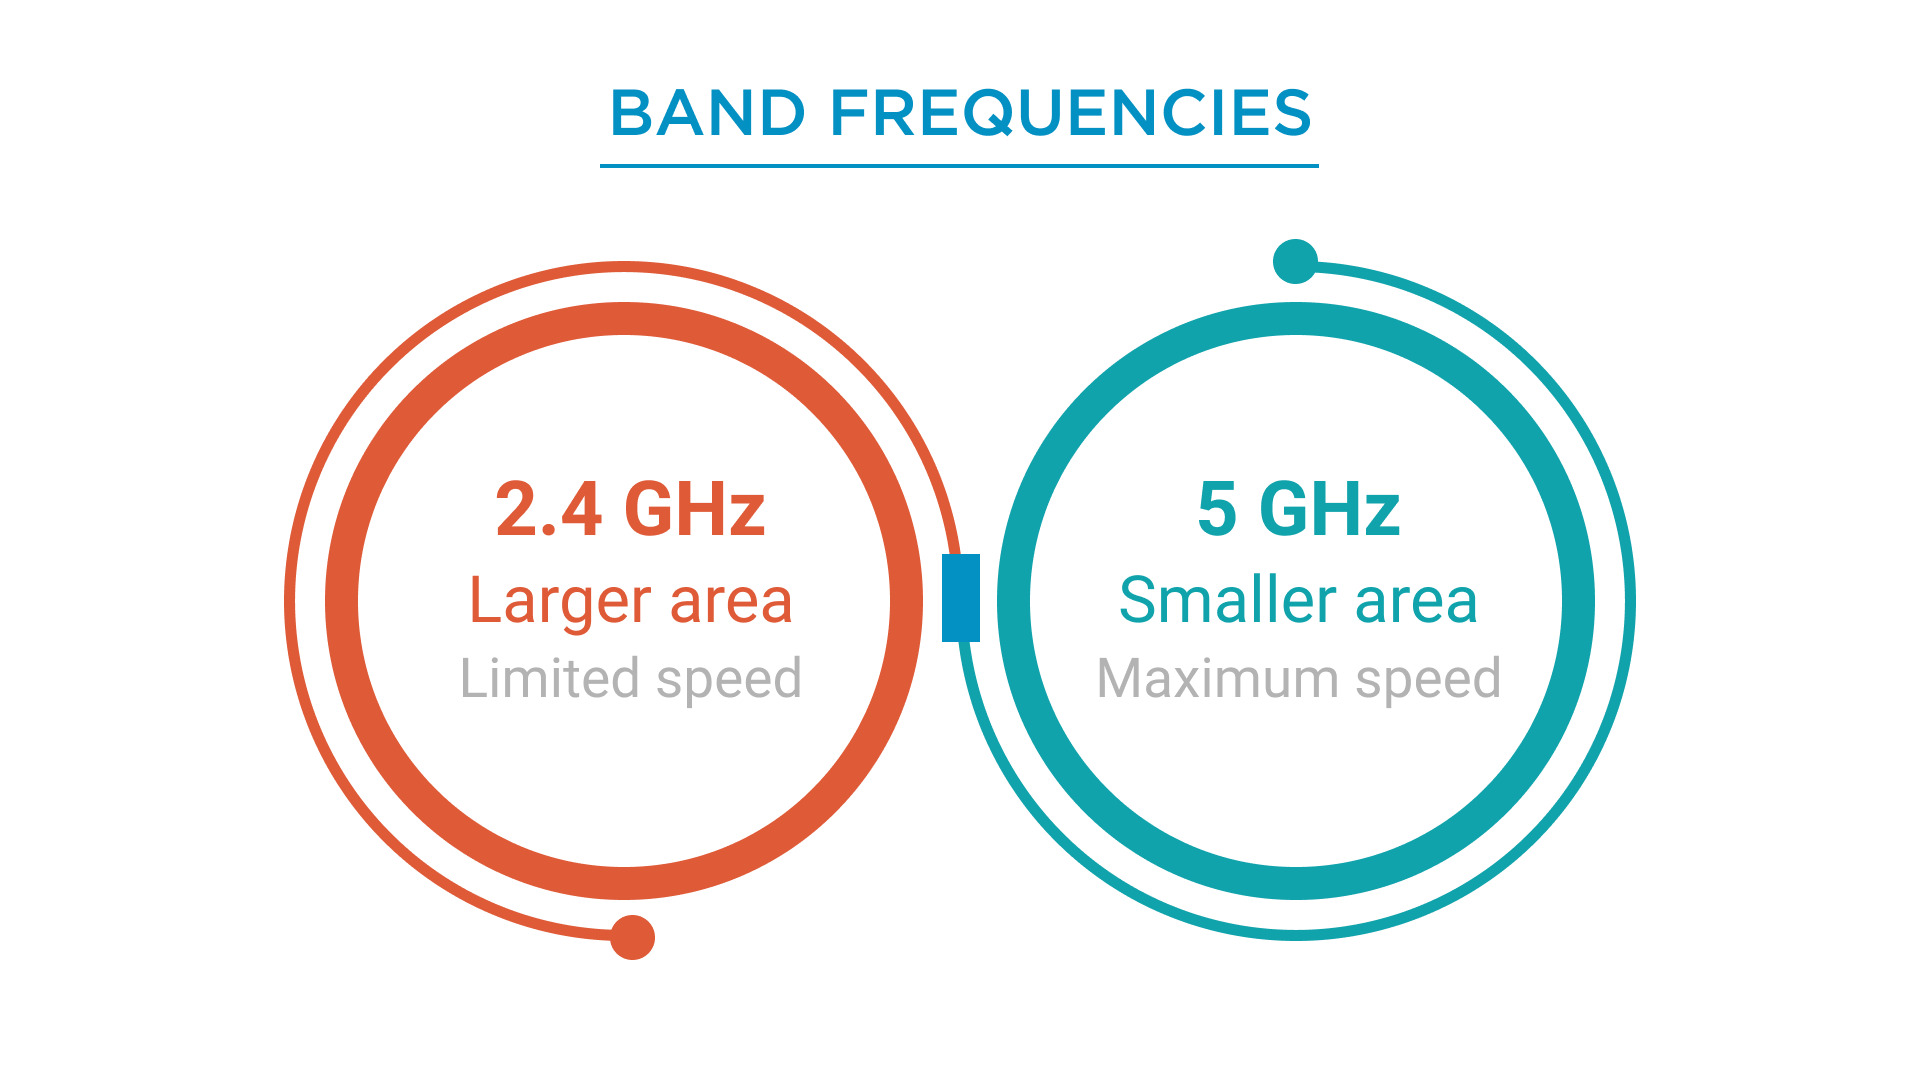
Mostly, modern generation routers offer two different band frequencies i.e. dual-band access points: 2.4 GHz and 5 GHz.

The 2.4 GHz is good for providing network coverage in a larger area but fails to provide the maximum speed.

The 5 GHz is good for providing maximum speed but limited to a small area only.

What is Band Steering?
When multiple devices are connected to one Wi-Fi network, it creates congestion issues. Because of which not one of the devices connected to the broadband network will get a seamless internet experience. This is where Band Steering technology becomes helpful. In simple words, Band Steering is the latest technology that pairs each device to the compatible frequencies.

How Band Steering Works?
Most of the old devices don’t come with the support of 5 GHz because it is new. This is where band steering jumps in. Band Steering automatically connects old devices with a 2.4 GHz band network and new devices with 5 GHz networks, reducing the chance of network congestion. The band steering technology comes within the Wi-Fi router.

As you move throughout your house, Band Steering technology allows your device to shift to the best band frequency. For example, while browsing on your phone if you are moving farther away from the router, your phone will switch to the 2.4 GHz from 5 GHz to extend the range of your connection and for experiencing seamless internet connectivity.

source from https://blog.height8tech.com/

new user interface for speedtest TM

Test your UNIFI speedtest.

Please select are you using “WIFI connection” or using “LAN cable/Wired Connection”

link to speedtest.tm.com.my

*** The actual internet connection speed may vary depending on many factors including the strength of your wireless signal, device performance, applications used, performance of servers accessed, usage of international links and so on.

new speedtest TM

HOW TO UPDATE YOUR DNS TM

HOW TO UPDATE YOUR DNS TM

▪ For unifi and Streamyx/Pre-Unifi customers
– Please set your DNS at your router/modem/RG and any related device to auto-assign
▪ For TM subscribers other than unifi and Streamyx
– Please set your DNS to: Primary: 202.188.18.188 Secondary: 1.9.1.9

▪ Laptop/Desktop
– Changing the DNS in TCP/IP setup

▪ Windows 7
1. Click Start -> Control Panel -> Network and Internet -> Network and Sharing Center ->
Change adapter settings.
2. Select the connection. For example:
– For Ethernet connection, right click Local Area Connection -> Properties
– For Wireless connection, right click Wireless Network Connection -> Properties
3. Select the Internet Protocol Version 4 and double click it
4. Set Obtain IP address automatically and DNS server address automatically and click OK
to save the setting.

▪ Windows 10
1. Click Start -> Settings -> Network and Internet
2. Select the connection. For example:
• For Ethernet connection, click on Ethernet -> Change adapter options. Select
Ethernet, right click and choose Ethernet -> Properties
• For Wireless connection, right click WiFi -> Change adapter options. Select WiFi, right
click and choose WiFi -> Properties
3. Select the Internet Protocol Version 4 (TCP/IPv4) and double click it
4. Set Obtain IP address automatically and DNS server address automatically and click OK
to save the setting.

▪ Mac OS
1. Choose Apple -> System Preferences -> Network.
2. Select the network connection service from the list, and then click Advanced.
3. Select DNS tab
4. Click “+” and insert IP DNS. Click “-” to remove DNS IP 202.188.0.133

▪ MODEM
– Changing the DNS in Modem/RG
1. Access the router/modem landing page – 192.168.0.1 or 192.168.1.1 (depend your RG LAN IP Address)
. (Only for modem/RG provided by TM). Landing page link may be different
for non-TM modem/RG)
2. Key-in “username” & “Password”.
3. Click the internet setup/advance setting/setup.
4. Search for DNS server setting, set as Auto & save the setting.

Using unifi Plus Box? Ever encounter blank screen or app crash?

Using unifi Plus Box? Ever encounter blank screen or app crash?

No worries, all you have to do is to clear the said app cache. It will solve most of the problem.

And to do that, you will need to go to the box’s Settings>App


UPB box fix

Make sure you select Clear Cache ya. After that you can relaunch the app like normal.

Back to basic hygiene installation unifi

Back to basic hygiene installation unifi – panduan mudah cara-cara pemasangan drop fiber unifi mengikut speksifikasi yang betul.

Jom Rakan-Rakan semua kita implement perkara-perkara basic dalam kerja harian kita.

MENU