RG DLINK DIR-830M Modify Boot Setting

1. Download new firmware from the link below https://bit.ly/dir830m2
Save this files for later use

2. After Firmware upgrader please reset the device.

DLINK DIR 830M

STEP 1: Open up a web browser and enter the default gateway’s IP address (192.168.0.1) in the Address\URL field.

STEP 2: Enter the username and password (admin/xxxxxxxx) according to device label

STEP 3: Click Login to log in to the Web page.

 DLINK DIR 830M

STEP 4: Click on Management

STEP 5:  Click on Upgrade Firmware

STEP 6:  Click on Select File and select the downloaded firmware files.

STEP 7:  Click Upload to start upload and upgrade.

Device will reboot after upgrade. (It will take about 5mins)

HOW TO UPDATE YOUR DNS TM

HOW TO UPDATE YOUR DNS TM

▪ For unifi and Streamyx/Pre-Unifi customers
– Please set your DNS at your router/modem/RG and any related device to auto-assign
▪ For TM subscribers other than unifi and Streamyx
– Please set your DNS to: Primary: 202.188.18.188 Secondary: 1.9.1.9

▪ Laptop/Desktop
– Changing the DNS in TCP/IP setup

▪ Windows 7
1. Click Start -> Control Panel -> Network and Internet -> Network and Sharing Center ->
Change adapter settings.
2. Select the connection. For example:
– For Ethernet connection, right click Local Area Connection -> Properties
– For Wireless connection, right click Wireless Network Connection -> Properties
3. Select the Internet Protocol Version 4 and double click it
4. Set Obtain IP address automatically and DNS server address automatically and click OK
to save the setting.

▪ Windows 10
1. Click Start -> Settings -> Network and Internet
2. Select the connection. For example:
• For Ethernet connection, click on Ethernet -> Change adapter options. Select
Ethernet, right click and choose Ethernet -> Properties
• For Wireless connection, right click WiFi -> Change adapter options. Select WiFi, right
click and choose WiFi -> Properties
3. Select the Internet Protocol Version 4 (TCP/IPv4) and double click it
4. Set Obtain IP address automatically and DNS server address automatically and click OK
to save the setting.

▪ Mac OS
1. Choose Apple -> System Preferences -> Network.
2. Select the network connection service from the list, and then click Advanced.
3. Select DNS tab
4. Click “+” and insert IP DNS. Click “-” to remove DNS IP 202.188.0.133

▪ MODEM
– Changing the DNS in Modem/RG
1. Access the router/modem landing page – 192.168.0.1 or 192.168.1.1 (depend your RG LAN IP Address)
. (Only for modem/RG provided by TM). Landing page link may be different
for non-TM modem/RG)
2. Key-in “username” & “Password”.
3. Click the internet setup/advance setting/setup.
4. Search for DNS server setting, set as Auto & save the setting.

Cara setting change LAN IP ROUTER DLINK DVG-F2452 to follow internal network pelanggan.

Setting change LAN IP router DLINK DVG-F2452 to follow internal network pelanggan (CONTOH IP GATEWAY NETWORK PELANGGAN >> 192.168.1.1 )

  1. Check setiap PC pelanggan untuk dapatkan Gateway IP yang setting di dalam network card pc pelanggan terlebih dahulu.
  • Network & Internet setting.
  • Right Click Ethernet >> Ethernet Properties >> Double click Internet Protocal Version 4 (TCP/IPv4).

  • Refer Default Gateway >>Contoh Network pelanggan menggunakan Default gateway 192.168.1.1
  • SDZ / RU / TROS, perlu setting di LAN IP Router mengikut internal network yang pelanggan guna contoh 192.168.1.1 sekiranya LAN IP default router ialah 192.168.0.1


2. Setting di RG Dlink DVG-F2452 .

  • Setup >> LAN IP address 192.168.1.1 >> Apply Changes.
  • Now LAN IP router sudah bertukar 192.168.0.1 kepada 192.168.1.1

3. Verify LAN IP di Router

  • DHCP >> Gateway Address ialah 192.168.1.1

Nak tanya Unifi FTTH boleh pasang/install alarm ker?

Jawapan ringkas dan mudah

Encik, nak kena tengok teknologi alarm apa yg pelanggan pakai.

Yang boleh, selalu alarm yang pakai auto dailing.

normally alarm guna DTMF feature.. utk unifi ada feature ini (sama macam DEL) -boleh rujuk vendor alarm dulu/check balik setting.

terima kasih

Configuration D-LINK DIR – 830M

Firmware version : V1.1.1

SETUP WIZARD

STEP 1: Open up a web browser and enter the default gateway’s IP address (192.168.0.1) in the Address\URL field.

STEP 2: Enter the username and password (admin/xxxxxxxx) according to device label

STEP 3: Click Login to log in to the Web page

This page will be shown by default for new device.

STEP 4: Click on Setup

STEP 5: Click on Next to Start Wizard.

STEP 6: Default mode is Gateway

STEP 7: Click Next to next step

STEP 8: Key in the PPP Username & Password

STEP 9: Click Next to continue

STEP 10: Click Next to continue

STEP 11: Maintain the default password configuration. (Password filled with current default random password according to device label)

STEP 12: Click Next to continue

STEP 13: Configure the 2.4 G and SSID and Password

STEP 14: Configure the 5 G and SSID and Password

STEP 15: Click Finished

Manual PPPoE Setup

STEP 1: Open up a web browser and enter the default gateway’s IP address (192.168.0.1) in the Address\URL field. STEP 2: Enter the username and password (admin/xxxxxxxx) according to device label STEP 3: Click Login to log in to the Web page STEP 4: Click TCP/IP STEP 5: Click WAN Setting STEP 6: Select WAN1 in Connection name STEP 7:Click IPv4 STEP 8: Select PPPoE STEP 9: Key in the PPP Username & Password STEP 10: Check to enable VLAN STEP 11: Fill in VLAN ID 500 STEP 12: Click Save & Apply the router to refresh

Configure Fiberhome SR – 1041Y

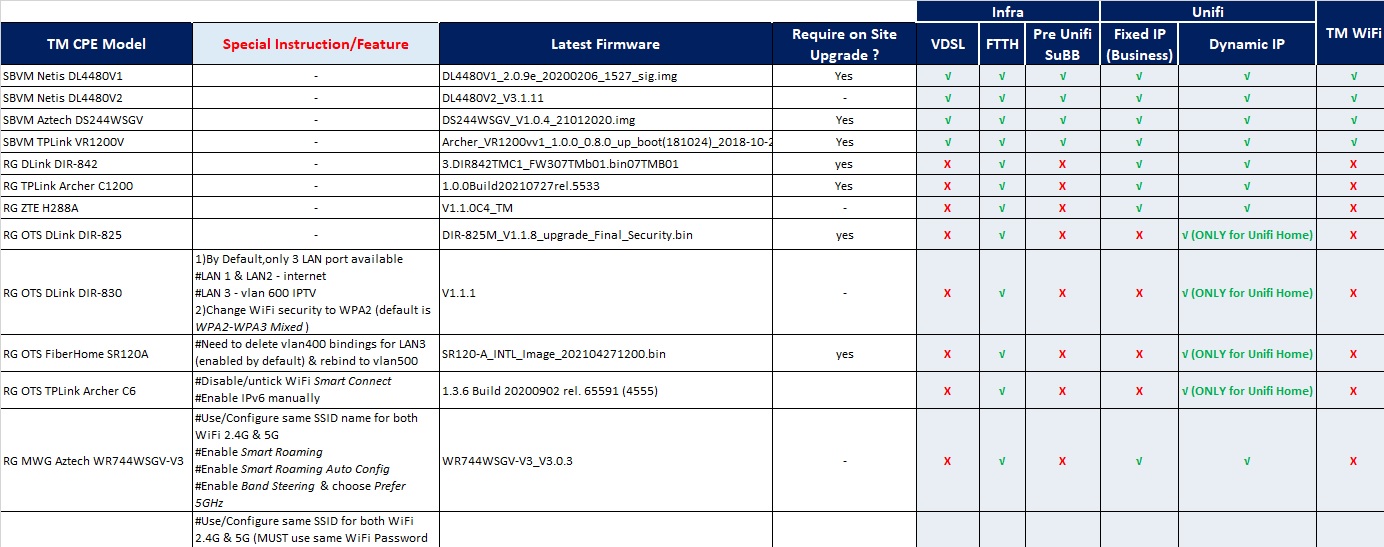
Look Firmware version : RP0100

STEP 1: Open up a web browser and enter the default gateway’s IP address (192.168.1.1) in the Address\URL field.

STEP 2: Enter the username and password (superadmin /f1ber@dm!n) according to device label

STEP 3: Click SIGN IN to log in to the Web page.

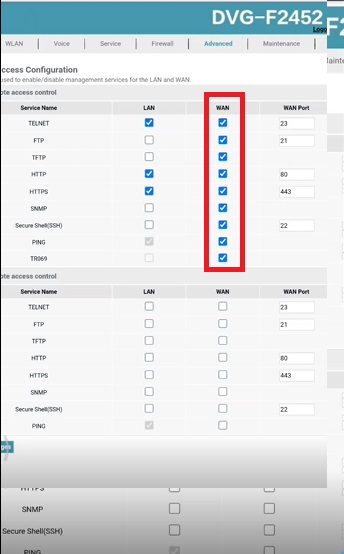
STEP 4: Click Advance Step

STEP 5: Click WAN Service

STEP 6: Select Connection name – 1_INTERNET_R_VID_500

STEP 7: Select Package Type: PPPoE

STEP 8: Select Mode: Route

STEP 9: Select IP Protocol Type: IPv4/ IPv6

STEP 10: Enable VLAN and enter VLAN ID 500

STEP 11: Select Service Type: INTERNET

STEP 12: Key in the PPP Username & Password

STEP 13: Select Dial Mode: Automatically

STEP 14: Select WAN Get IP Mode: PPPoE

STEP 15: Select Get IPv6 Prefix Mode: PrefixDelegation and Get IPv6 Address Mode: DHVPv6

STEP 16: Select Bound Ports: LAN 1,LAN 2, LAN 3, SSID 1 & SSID 6.

STEP 17: Click Apply to save config

STEP 18: *Reboot RG by power on off the device power button.

STEP 19: Select Status

STEP 20: Select WAN

STEP 21: Verify Connection Status: Connected

WiFi Configuration Setting

STEP 1: Open up a web browser and enter the default gateway’s IP address (192.168.1.1) in the Address\URL field.

STEP 2: Enter the username and password (superadmin /f1ber@dm!n) according to device label

STEP 3: Click SIGN IN to log in to the Web page

STEP 4: Select Basic Setup STEP 5: select WLAN STEP 6: Click Basic Config 2.4GHz STEP 7: Configure the SSID STEP 8: Click Apply to save the configuration. STEP 9: Repeat STEP 6 to STEP 6 for Basic Config 5GHz

STEP 10: Click Security Setting 2.4GHz STEP 11: Key In WPA Preshare key : password STEP 12: Click Apply to save the configuration STEP 13: Repeat STEP 10 to STEP 12 for Security Setting 5GHz


MENU