Cara Upgrade Firmware TP-LINK ARCHER AC1200 3 AERIAL


IMPORTANT NOTE

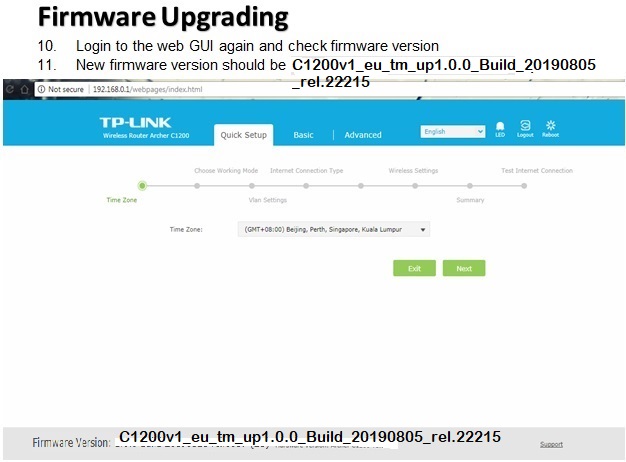
1.C1200v1_eu_tm_up1.0.0_Build_20190805_rel.22215 (upgrade firmware yg ni dulu)

2.C1200v1_eu_tm_up_1.0.0Build20200306rel.15999_20200306_15.16.53 (diikuti firmware ini)

***perlu berhati-hati / sila disconnect WIFI & VPN dulu. Hanya LAN cable ke Router saja.

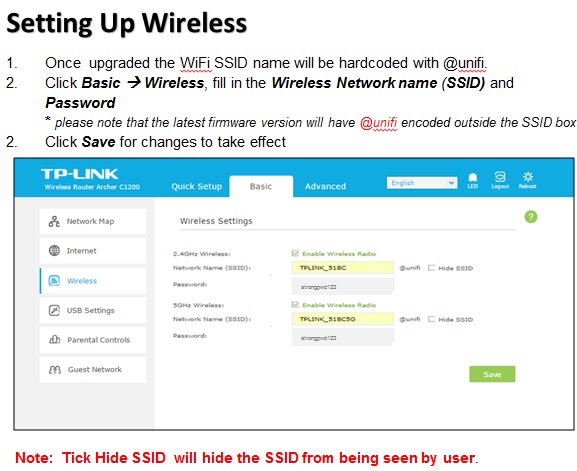
Please be reminded that after the firmware upgrade, your Wireless SSID will be changed to new SSID with @unifi. (Eg; customer_a@unifi) . You may need to re-authenticate your wifi SSID connection for using the Wireless connection 

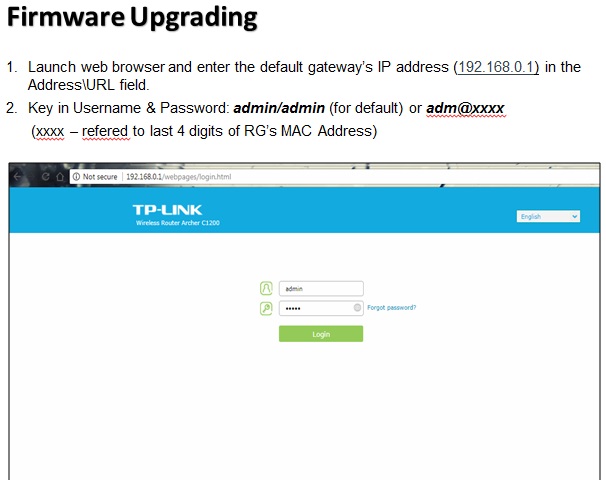
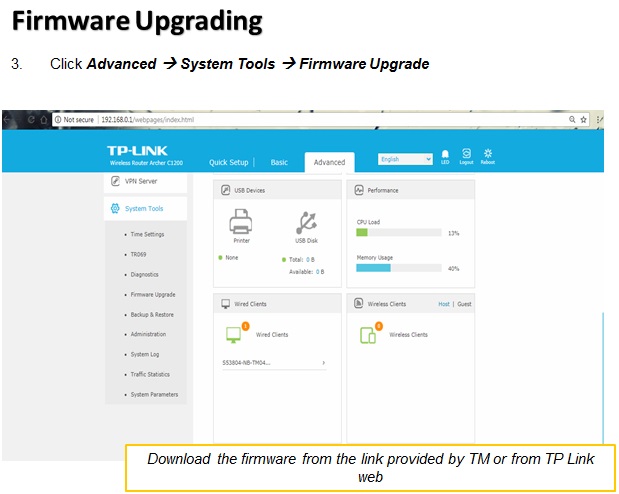
Dicadangkan tuan2 untuk buat hard reset / factory reset selepas berjaya upgrade firmware baru. Ini untuk mengatasi masalah CCTV/DYDNS not connected.

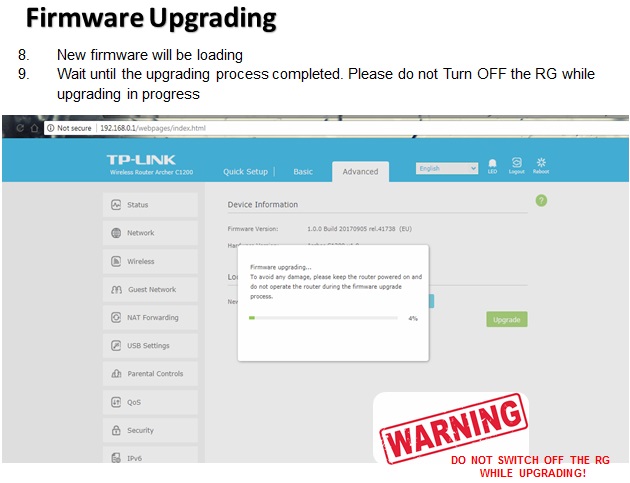
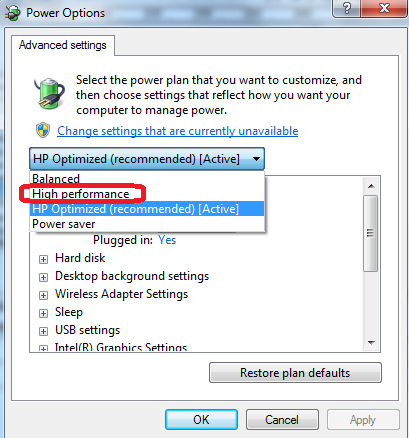
* Sila lakukan upgrade firmware baru dengan berhati2 supaya tidak merosakkan RG TPLINK pelanggan.

RUN SPEEDTEST HIGH SPEED TURBO ON SAVE MODE

HIGH SPEED TURBO 800Mbps  (sekadar panduan saja) jika still tak dapat speedtest yg dilanggan. Perlu buat test di OLT (sila rujuk kepada team berkaitan).

SILA GUNA CABLE LAN CAT5E, CAT6 ke atas semasa testing speed.

Win-32 bit  Win 10 Better Run Laptop yang guna Win-64bit
LANGKAH 1 : Buat Speedtest dulu macam biasa jika tak OK Pasang Power Plug – ON

Pastikan Anda pasang power plug utk adapter (POWER ON).

LANGKAH 2 : Check NIC laptop Anda

Window Mobility – Tukar mode option kepada High Preformance mode

nic Run Speedtest Guna Browser CHROME / FIREFOX http://speedtest.tm.com.my
LANGKAH 3 : Pastikan Link Sudah 1Gbps. Jika tak dapat jugak  
   
nic  

LANGKAH 4 :  Pada NIC….Klik Properties > Configure >Advanced >Speed & Duplex > Select Manual 1.0Gbps Full Duplex


LANGKAH 5 : Klik pada gambar battery > More power option > Change Plan Setting > Change Advance Power Setting > Pilih High Performance ,klik “OK”  
 

LANGKAH 6 (MONITOR CPU LAPTOP) :  Anda Boleh…klik Open the Resource Monitor is to type resmon.exe into the Start Menu search box and press Enter. Or, you could open the Start Menu and go to “All Programs -> Accessories -> System Tools -> Resource Monitor” (tujuan untuk monitor keupayaan CPU laptop anda) …selalu bila run speedtest..CPU boleh running sampai 100% hingga kadang-kadang speedtest tak capai kelajuan diperlukan. 


LANGKAH 9 : Jika masih tidak berjaya jugak dapat SPEEDTEST 800Mbps…Sila run laptop dalam keadaan SAVE MODE > Run Save mode with Networking

 >>>BUKA BROWSER CHROME ANDA SEMASA SAVE MODE DAN RUN SPEEDTEST.TM.COM.MY<<<

 
Jika dalam keadaan SAVE MODE masih tak berjaya dalam speed 800Mbps. MAKA LAPTOP tuan2 memang tak boleh support high speed turbo. atau blh minta Pihak GIT upgrade software kepada WIN-64bit.  

Sila guna browser  
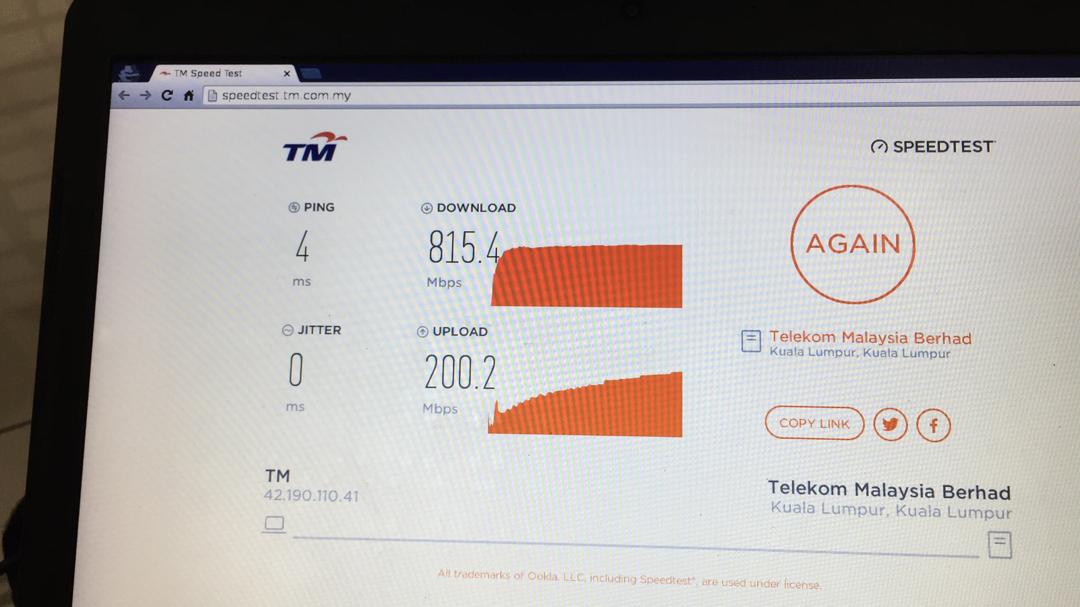
atau Safari utk run speedtest.

PENERANGAN USB UNIFI TURBO SOFTWARE UTK PENDRIVE

KLIK SINI UTK DOWNLOAD & VIEW DEMO USB SOFTWARE

USB UNIFI TURBO SOFTWARE

KLIK SINI UTK DOWNLOAD & LINK DOWNLOAD USB SOFTWARE

SINGTEL WIFI BRIEFING

TIPS CARA SUSUN KEDUDUKAN EQUIPMENT UNIFI

TIPS

Simple tips yang boleh mengelakkan equipment panas.
 
SILA SUSUN EQUIPMENT UNIFI ANDA ASING-ASING
JANGAN SUSUN EQUIPMENT UNIFI ANDA BERTINDIH
Cara paling baik adalah dengan Letakkan RG di kawasan terbuka di lokasi sesuai. 
Kerana cara isyarat Wi-Fi bergerak, yang terbaik adalah mengangkat
RG(letak di kedudukan diatas (rujuk gambar) -jika boleh).
Jangan letak di bawah meja, dalam almari,berdekatan alatan metal, dll.


Elakkan meletak RG berdekatan dengan peralatan microwave.

Setting Fix IP Address Router DLINK 842

Pastikan router TM Dlink 842 (4 ANTENA) telah install firmware terbaru. VERSION 3.06TM.


ATAU JIKA SUBNET 255.255.255.252 (1 FIX IP ADDRESS SAJA) SETTING SEPERTI INI


HOW TO SETUP ROUTER FIBERHOME SR-120A

LOGIN VIA http://192.168.1.1


• Check the firmware version, which is SR_V1.02 (latest)


Removing VLAN 400 configuration for residential customer
1.Go to Advanced Setup and click on WAN Service

2.Expand the WAN configuration (with arrow), click on VID 400.

3.Click ‘Delete’ to remove configuration of VLAN 400.

•Insert PPPoE account
1.Go to Advanced Setup and click on WAN Service

2.Confirm the connection name with ‘1_INTERNET_R_VID_500’

3.Fill in the PPPoE username and PPPoE password

4.Add binding of VLAN 500 to LAN 3.

5.Lastly, click ‘Apply’ to activate the internet service.

6.Go to Status and click on ‘WAN’ to check the WAN connection status of IPv4 and IPv6.

WIFI CONFIGURATION (2.4 GHZ)

1.Go to Basic Configuration and WLAN, click on Basic Config 2.4GHz

2.Make sure WLAN 2.4GHz and SSID are enabled.
3.The SSID name can be set manually, click ‘Apply’ after changed.


4.Go to Security Setting 2.4GHz, WiFi password/WPA Preshare key can be defined according to customer preference.
5.Click ‘Apply’ to activate the setting.


WIFI CONFIGURATION (5 GHZ)

 1.Go to Basic Configuration and WLAN, click on Basic Config 5GHz

2.Make sure WLAN 5GHz and SSID are enabled.
3.The SSID name can be set manually, click ‘Apply’ after changing the SSID.

4.Go to Security Setting 5GHz, WiFi password/WPA Preshare key can be defined according to customer preference.
5.Click ‘Apply’ to activate the setting.

END


MENU